

This week's project is something I've been wanting to do for a while now, and it revolves around my adorable fur companion Khloe.
We have a GIANT blank wall at our house, that I want fill with our beautiful girl. I've spent countless hours on Pintrest to find the perfect projects... and today, I'm going to make something for the wall I want to devote to our fur child.
 |
| Courtesy: Better Homes and Gardens |
I wanted to find a way to copy it without it being completely similar. I like the use of different paper for the dog's bow, and the brightly colored background the artist used.
But before I could get started figuring out how I wanted to decorate my silhouette, I had to figure out how to make one. I figured using a picture would be easiest but there were several tutorials, and I was having a hard time finding one that worked for me. Below, I've listed the best ones I found for the programs I had, or someone I knew had:
If you're good with/have Photoshop, I'm sure you could figure this out in a flash! I, on the other hand, haven't used Photoshop since college.... so I needed to find an easier way to make this project.
I decided to use the "Picasa with Picnik" since I already have Picasa on my computer.
Step One: Choose a Picture

I wanted a photo of Khloe that highlighted her gigantic ears, and allowed me to play around with some different materials when it came time to decorate my silhouette. I like that you can clearly see her collar and tongue in this picture.
If you're going the Picasa route, I'll have to give you some new instructions... because Picnik doesn't exist anymore.
Step Two: Edit your Picture

Once you have your photo selected in Picasa, chose "Open in Creative Kit." This window will allow you to trace around your photo and turn it into a silhouette. When you're in creative kit, you want to chose the "Decorate" and then choose "Doodle"

Once in Doodle, change your paint brush color to white-- and use it to white out the background around your pet's photo. Like this:
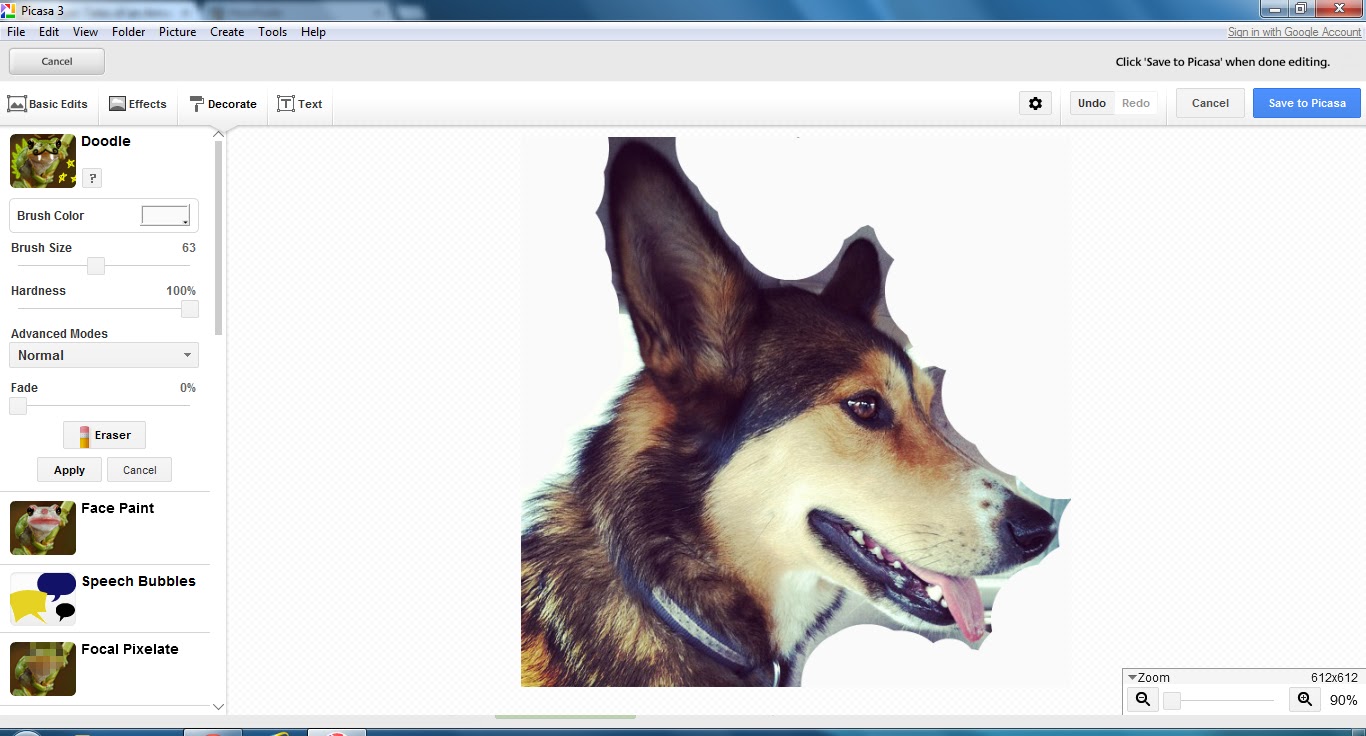
Now, zoom in on your picture so you can focus on the details. Using a smaller brush size, outline your dogs silhouette:

Touch up the picture by "whiting out" the rest of the background now that you've outlined your dog's photo. DON'T FORGET TO CLICK APPLY!

Now that you're background is white, head to the "Basic Edits" section, click "Exposure" and move the contrast bar all the way to the right. This should make your dog's photo all black. If not, head back to Doodle and fill in the blanks with black and white until you get the picture you want. Don't for get to click APPLY after each step!
Step Three: The Finishing Touches
I'm so in love with the way this turned out. I decided to use a canvas I bought at one of the craft stores in town. I loved the way the blogger did her silhouette in my Picnik instructions. So I decided to do a variation on it.

I used "Mod Podge" to take an old newspaper article (one with just words, no pictures) and attach it to the canvass. If you go this route, make sure you have a big enough piece or pieces to cover top and sides of the canvass. Basically, you want it to wrap around like a present.
Once I had the newspaper the way I liked it, I set it aside to let it dry.
I printed out the silhouette of Khloe, and made sure the dimensions were large enough to fit on the canvass. I did my printing at work... But I'm sure any nice worker at Kinkos or Staples will be happy to help you out.
Once the photo was the size I wanted, I cut it out and attached it to the canvas, using more "Mod Podge."

After all that fuss about using different material to highlight certain aspects of the photo, I decided to just leave it be. I liked the simplicity of this element and halfway through the process, I reminded myself that this is just one piece in a puzzle that will be an entire wall... I didn't want to make it look busy.
What do you think?
No comments:
Post a Comment